
When using the CorelDRAW PowerClip effect you can insert one object into another, which, in turn, creates a new and totally different design. The object placed inside an object is the contents object. The object with the contents inside of it is the container object.
Both the contents and the container objects can incorporate original CorelDRAW designs, text, and other formats, including bitmaps. I like to use the PowerClip effect to integrate photos into my CorelDRAW drawings. But it’s also a good way to create an intricate drawing by combining complex objects to create an even more elaborate design.
Let’s Draw
I’m sure you’d like to try it out, but before we create our PowerClip, we need an object. Let’s use the photograph below. I need you to save it on your computer, because we’re going to use it as both a contents and a container object.

Save this photograph to your computer
To save the photograph, place your cursor on top of it, and then right-click your mouse. Select Save Picture As from the menu, and name it desert_pic.jpg. Make sure to save it on your computer to a place where you can quickly retrieve it.
Now create the contents and container objects.
1. Start with a new drawing page with a landscape orientation and points as the unit.
2. Select the Text tool from the toolbox, or press F8, and then click the cursor on the upper-left side of the drawing page. For the font selection, you’re going to want to use a very thick and large font, so we can place an object inside. In the example above, I selected Furtura MD BT with a font size of 150. If you can’t find this font style in your font list, select one that’s similar.
3. Next, type the following word: Desert.
4. Finally, open the Import window, and select desert_pic.jpg.
5. Using the import cursor, place the photograph right below the text.

Place photograph below text
Good job! We’re now ready to create a PowerClip.
1. Select the Pick tool, and place the cursor over the photograph, but don’t click it. Instead, hold down the right mouse button, and drag the photograph over the text.
2. When you’ve positioned the photograph over the text, release the mouse button, and then select PowerClip Inside from the menu. The photograph should jump right inside the text. It may take a couple tries to get it to work. Sometimes it helps if you click a blank part of the drawing page with the Pick tool before dragging the contents object. Keep at it; you’ll get it.
PowerClip created from photograph and text (click the video)
You did it! You created your first PowerClip using the photograph as the contents object and the text as the container object.
I like my PowerClip, but I think it would look even better if more of the ground appeared in the text. Luckily, you can easily edit both the contents object and the container object after you’ve created a PowerClip. Simply select Effects > PowerClip > Edit Contents from the menu bar. Those commands open the PowerClip, giving you access to the object inside.
You can edit the object in almost any manner, including resizing, skewing, adding fill, or even applying special effects. After you edit the objects, you’ll need to close the PowerClip by selecting Effects > PowerClip > Finish Editing This Level, and the contents object will return to the container object.
Edit your PowerClip
1. Click the PowerClip with the Pick tool, and then from the menu bar select Effects > PowerClip > Edit Contents. The photograph will then jump out of the text.
2. With the Pick tool, move and reposition the photograph so that mostly the ground appears in the text.
3. When you’re satisfied with your results, select Effects > PowerClip > Finish Editing This Level.
Edit the PowerClip by moving the contents object (click the video)
Nice work! But let’s take it a step further by placing our PowerClip inside an ellipse.
1. Move the PowerClip off the drawing page for now, so you have room to work. But keep it close, because we’ll return to it shortly.
2. Now, select the Ellipse tool, and then draw a circle. I want the ellipse to have a thick outline with a color that closely matches the ground. So, change the outline width to about 8. Then change the outline color to brown by right-clicking the mouse on the brown color swatch.
3. Next, open the Import window, select desert_pic.jpg, and place the photograph below the circle.
4. Select the Pick tool, and place the cursor over the photograph. Hold down the right mouse button, and drag the photograph over the ellipse.
5. When the photograph is positioned over the ellipse, release the mouse button, and then select PowerClip Inside from the menu. The photograph should jump inside the ellipse.
6. Finally, adjust the photograph so that more sky than ground appears in the ellipse by using the menu bar to select Effects > PowerClip > Edit Contents.
7. Resize and move the photograph until you see mostly sky appear in the ellipse.
8. When you’re satisfied with your results, select Effects > PowerClip > Finish Editing This Level.

Make sure more sky than ground appears in the ellipse
Here’s a tip before you continue! You can also open the Effects menus for PowerClips by selecting a PowerClip with the Pick tool and right-clicking the mouse.
That looks great! But if you think a PowerClip inside an object looks nice, let’s see what adding another PowerClip to the design will do.
1. Select the Pick tool, and place the cursor over the Desert text PowerClip. Hold down the right mouse button, and drag it over the ellipse PowerClip. When the text is positioned over the ellipse, release the mouse, and then select PowerClip Inside from the menu.
2. Now adjust the text so that it appears in the sky of the photograph by selecting Effects > PowerClip > Edit Contents from the menu bar.
3. Resize and move the text until you’re satisfied with the results. Select Effects > PowerClip > Finish Editing This Level.

PowerClip inside a PowerClip
Great job! Now save it.
Create PowerClips Balloons
That’s was an excellent design you just drew. Now let’s incorporate a photograph into more of a line drawing using the PowerClip effect.
Start by placing your cursor on the photograph, and then right-click your mouse. Select Save Picture As, and name it balloon_pic.jpg.

Save this photo
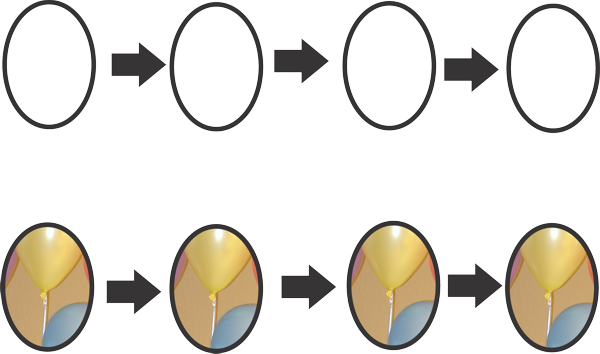
1. Create a new drawing page, with a landscape orientation and points as the unit. Select the Ellipse tool, and draw an egg-shaped ellipse with an outline width of 6. Next, copy and paste three more balloons, so you have a total of four.
2. Open the Import window, and select balloon_pic.jpg. Using the import cursor, place the photograph right below the balloons. Pretty easy so far!
3. Select the Pick tool, and place the cursor over the balloon_pic.jpg, but don’t click it. Instead, hold down the right mouse button as you drag it over the first balloon on the left. Release the mouse, and then select PowerClip Inside from the menu.
4. Now open the Attributes Eyedropper tool. Look at the Effects menu, and then make sure the PowerClip box is selected. No other boxes from other menus should be checked. Click the balloon you just updated with the Attributes Eyedropper tool, and then click all of the other balloons. Good job!

Create four PowerClip balloons
5. If you’re using a newer operating system, like Windows 8, your balloons may look like those below. That’s okay. You’ve still created a PowerClip; the photograph just isn’t centered. We’ll take care of that in a moment.

PowerClip balloons for Windows 8 users

6. Now resize and move the photograph inside each balloon. With the Pick tool, select any balloon, and then go to Effects > PowerClip > Edit Contents. When the photograph appears in front of the balloon, move and resize the photograph so that only one of the balloons from the photographs appears in the balloon drawing. The photograph may appear completely outside of the balloon and off to the side. That’s okay. Just move it into position, and resize it accordingly. When you’re satisfied with the position of the photograph, select Effects > PowerClip > Finish Editing This Level.
7. Do the same for each balloon, but make sure you’ve selected a different colored balloon for each drawing.

Resize and move the photo within each balloon

8. If you’re using a newer operating system, such as Windows 8, the photograph may appear completely outside and off to the side of the balloon shapes. Simply move the photograph into position, and resize it accordingly. When you’re satisfied with the position of the photograph, select Effects > PowerClip > Finish Editing This Level.

Editing a PowerClip for Windows 8 users
9. Now select the Freehand tool, and draw a string with an outline width of 6 for each balloon. But don’t draw a straight line. Make it a little more stringy. If necessary, use the Shape tool to add some curvature. When you’re satisfied with your results, group each balloon string. Finally, using the Pick tool, rotate and move the balloons so that the bottoms of the strings meet in a bunch.

PowerClip balloons
Excellent! Now save your balloons.
