Drawing Balloons with CorelDRAW

In this exercise we’re going to draw some balloons using the Attributes Eyedropper tool. Remember, save your work throughout (just in case).
Attributes Eyedropper Tool
The Attributes Eyedropper tool allows you to copy the properties from one object to another object, including colors and fills, object sizes and rotations, and even special effects.

Attributes Eyedropper tool
Copying these types of elements can be a real time-saver. You’ll find the Attributes Eyedropper tool on the toolbox.
You can use the property bar’s Attributes menu to select which elements to copy from one object to another. There are three Attributes menus you can use to choose these elements, and it’s as simple as selecting the appropriate box within each menu.

Attributes Eyedropper tool property bar
Properties: Select from this menu to copy the color and thickness of an outline, the color or fill of an object, or the font, size, and format of text.
Transformations: Use selections from this menu to copy object sizes, rotation values, or to relocate an object on the drawing page.
Effects: You can use this menu to copy special effects from one object to another, including PowerClips.
Now that you know a bit about the Attributes Eyedropper tool, let’s put it to work.
Get Ready to Draw
Now let’s draw some balloons with various shapes, fills, and effects while using the Attributes Eyedropper tool. In this instance, I don’t recommend that you veer off too much on your own. Instead, please follow my instructions, so you get the hang of effectively using the Attributes Eyedropper tool.
1. Start with a new drawing page with a landscape orientation and points as the unit.
2. Select the Ellipse tool and draw an egg-shaped ellipse, with an outline width of 2. Now draw a smaller egg-shaped ellipse inside the upper right-hand corner of the ellipse you just drew, also with an outline width of 2.
3. Now, select the Freehand tool, and draw a straight line from the bottom center of the larger ellipse, and set the outline width to 4.
4. You should now have a balloon-shape attached to a string. Convert it to a curve by right-clicking the mouse, and then selecting Convert To Curves from the menu. Now select your balloon and string, and then copy and paste five more, so you have a total of six.
5. Select the Text tool, and below each balloon, number them 1 through 6.

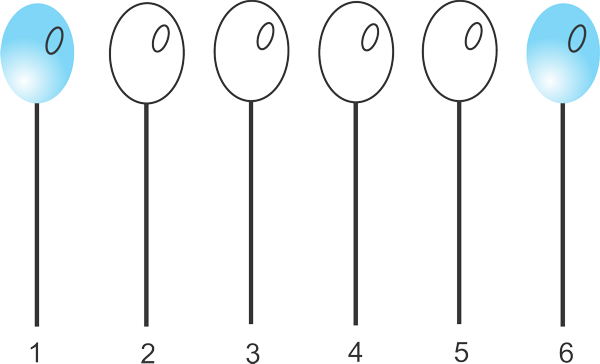
Create six identical balloons
Good job! Now we’re ready for the Attributes Eyedropper tool. We’ll start off nice and easy by rotating and resizing the inner ellipse of each balloon.
1. The first object we’re going to modify is the inner ellipse, so let’s make sure it’s in front of the larger ellipse. With the Pick tool, select each inner ellipse. From the menu bar, choose Arrange > Order > To Front of Page.
2. With the Pick tool, select the inner ellipse from balloon 1, and resize it to one-third of its original size. Then rotate it slightly to the right.
Here’s a tip before you continue! Zoom in really close so that you only select the inner ellipse and not the outer ellipse of each balloon.
3. Open the Attributes Eyedropper tool. Open the Properties menu, check the Outline box, and then click OK. Next, open the Transformation menu, check the Rotation and Size boxes, and then click OK. Make sure no other boxes are selected in any of the other menus, including the Effects menu.
4. Next, with the Attributes Eyedropper tool, click the inner ellipse of the balloon you just updated. Your cursor will change from an eyedropper to a paint bucket. Now, click the inner ellipse of each balloon. As you click each ellipse, it should conform to the size and rotation of the ellipse you originally modified.
Resize and rotate the inner ellipse of each balloon
Not a huge task, but we made quick work of it! Let’s keep going by filling our balloons with colors.
1. Select balloon 6, and then click the blue color swatch. Open the Interactive Fill tool, and select Radial. Choose the white Color marker, and move it to the lower left-hand corner of the balloon. Then move the blue Color marker toward the white Color marker.
2. Next, open the Transparency tool from the toolbox. From the Transparency Type menu located on the property bar, select Uniform. Move theTransparency Mid-point slider to 50. Last, open the Outline Pen tool, and remove the outline.
3. That looks good! Now do the same to balloon 1, but save some time by using the Attributes Eyedropper tool. Open the Attributes Eyedropper tool, and then open the Properties menu. Select the Outline and Fill boxes, and then click OK.
4. Your next step is to open the Effects menu. Select the Lens box, and then click OK. The Lens box is used to copy transparencies. Make sure no other boxes are selected on any other menus.
6. Now click balloon 6 with the Eyedropper tool, and then click balloon 1.
Blue balloons with transparencies
You’re doing great. Our next task is coloring some balloons red.
1. Select balloon 2, and then click the red color swatch. Open the Interactive Fill tool and select Radial. Move the white Color marker to the lower left-hand corner of the balloon, along with the red Color marker.
2. Now open the Transparency tool. From the Transparency Type menu select Uniform, and move the Transparency Mid-point slider to 25. Finally, open the Outline Pen tool, and remove the outline.
3. Open the Attributes Eyedropper tool. Check the Properties menu to make sure the Outline and Fill boxes are selected, and check the Effects menu to ensure that the Lens box is selected. No other boxes should be marked. Click balloon 2 with the Attributes Eyedropper tool, and then click balloon 4.
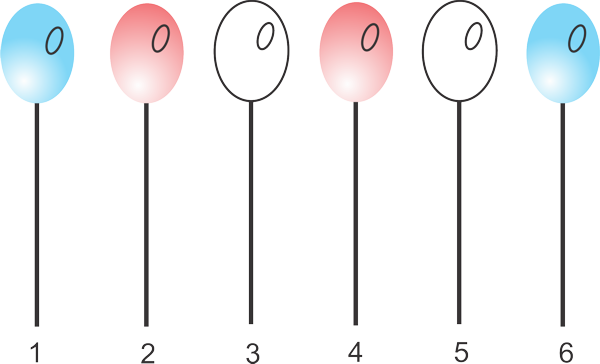
Red balloons with transparencies
Excellent job! Just two more balloons to color.
1. Select balloon 3, and then click the yellow color swatch. Open the Interactive Fill tool, and select Radial. Move the white Color marker to the lower left-hand corner of the balloon along with the yellow Color marker.
2. Now open the Transparency tool. From the Transparency Type menu, select Uniform, and move the Transparency Mid-point slider to 10. Finally, open the Outline Pen tool, and remove the outline.
3. Open the Attributes Eyedropper tool. Check the Properties menu, and make sure the Outline and Fill boxes are selected. Look at the Effects menu, and be sure that the Lens box is also selected. Again, no other boxes should be marked. Click balloon 3 with the Attributes Eyedropper tool, and then click balloon 5.

Yellow balloons with transparencies
Great work! Let’s finish everything off by turning those inner ellipses into reflections.
1. With the Pick tool, select the inner ellipse from balloon 6, and then click the white color swatch.
2. Remove the outline; then open the Transparency tool. Select Uniform from the Transparency Type menu, and then move the Transparency Mid-pointslider to 75.
3. From here, you know the drill. Open the Attributes Eyedropper tool, and make sure that the only boxes checked are Outline and Fill from the Propertiesmenu and Lens from the Effects menu. Now click balloon 6 with the Attributes Eyedropper tool, and then click the ellipse from each balloon—except balloons 3 and 5.
4. Since balloons 3 and 5 are yellow, let’s tone down the transparency effect, otherwise it would be hard to see. So, change the ellipse from balloon 3, just like you did for all the others, except set the Transparency Mid-point slider to 60. Copy the ellipse from balloon 3 to balloon 5, and you’re done.
5. Finally, remove the numbers at the bottom of each balloon. We no longer need them.
Balloons with reflections
Great job! These balloons look good, but don’t you think they’re kind of stiff, just floating there in space? I can’t resist moving them around a little bit and giving them some highlights.
1. Begin by grouping each individual balloon so that the balloon, the reflection, and the string will move as one unit. With the Pick tool, click and hold the left mouse button, and drag it in a square-type motion completely over the far left balloon, ellipse, and string. Release the mouse, and then select Arrange > Group from the menu bar. Now continue grouping all of the other balloons.
2. Now let’s tie the balloons together. With the Pick tool, rotate and move each balloon so that the bottoms of all the strings meet. Try to keep balloons that are the same color apart. After you have an arrangement you like, group all of the balloons together.
3. Now you’re ready to add a shadow. Select the grouped balloons with the Pick tool, and then open the Drop Shadow tool. Click somewhere about halfway up the strings, and then drag the cursor to the right and up.
4. Adjust the Opacity slider the Shadow Feathering slider to your liking.
5. When you’ve satisfied with the results, make sure to save your balloons.
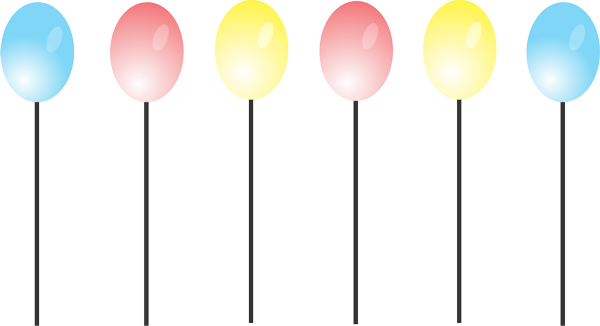
Balloons rearranged with shadows
That looks really good!
